GhostサーバをSSL化する
Nginxとかnode.jsとか知ってる人向け。
Ghostについて
GhostというCMSをご存知でしょうか?
知らない方はこちらの記事へ
一言でいうとnode.js製のCMSです。
nginxの設定
node.jsには自身にHTTPサーバとしての機能があるため、単純にサーバとして構築する場合はNginxなしで動きます。
ただし、node.jsでホスティングする場合
負荷が上がった場合にSSLの読み込み処理にイベントループを使われ、
パフォーマンスが落ちることがあります。
リクエストが増えることはそんなに期待していませんが、
低スペサーバなので負荷は抑えたいところなので、Nginxをかまします。
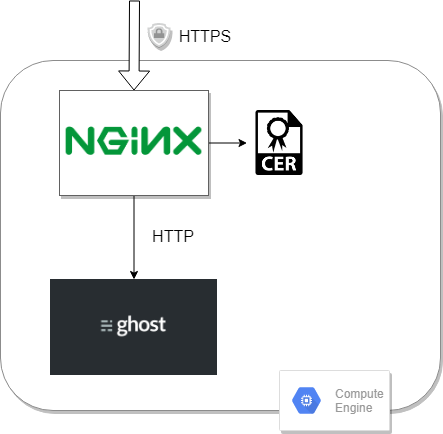
図にするとこんな感じです。
Nginxをリバースプロキシととして、リクエストをGhostに流します。
nginx側の設定
自分はこの設定をするために先にcertbotで証明書データを取得しておきました。
server {
    listen 80;
    server_name ubansi.com;

    return 301 https://$host$request_uri; # httpアクセスをリダイレクト
}

server {

     listen 443 ssl;
     ssl_certificate     /etc/letsencrypt/live/ubansi.com/fullchain.pem; # sslの証明書と中間証明書のパス
     ssl_certificate_key /etc/letsencrypt/live/ubansi.com/privkey.pem; # sslの秘密鍵のパス

     server_name ubansi.com;

     access_log /var/log/nginx/ghost.log;
     error_log /var/log/nginx/ghost_error.log;

     proxy_buffers 16 64k;
     proxy_buffer_size 128k;

     location / {
         proxy_pass http://127.0.0.1:2368; # Ghostで設定したポートへ飛ばす
         proxy_next_upstream error timeout invalid_header http_500 http_502 http_503 http_504;
         proxy_redirect off;
         proxy_set_header X-Real-IP $remote_addr;
         proxy_set_header Host $http_host;
         proxy_set_header X-NginX-Proxy true;
         proxy_set_header X-Forwarded-For $proxy_add_x_forwarded_for;
         proxy_set_header X-Forwarded-Proto $scheme;
     }
 }
ghost側の設定
ghostディレクトリの
core/server/config/env/config.production.json
にアクセスして、urlをhttps対応のドメインに変更する
{
    "url":"https://ubansi.com",
    "database": {
        "client": "mysql",
        "connection": {
            "host"     : "****",
            "user"     : "****",
            "password" : "****",
            "database" : "****",
            "charset"  : "utf8"
        }
    },
    "paths": {
        "contentPath": "content/"
    },
    "logging": {
        "level": "info",
        "rotation": {
            "enabled": true
        },
        "transports": ["file", "stdout"]
    }
}
一応databaseの接続情報は伏せています。
接続できる穴はないと思うけど…
SSLの設定
SSL証明書の発行はLet’s Encryptで行っています。
取得にはLet’s Encryptが提供しているcertbotを使います。
certbot
すごい親切なサイトで、OSとソフトを選ぶと必要なコマンドが出てきます。
自分の場合CentOSなので、
$ wget https://dl.eff.org/certbot-auto
$ sudo mv certbot-auto /usr/local/bin/certbot-auto
$ sudo chown root /usr/local/bin/certbot-auto
$ sudo chmod 0755 /usr/local/bin/certbot-auto
と出たのですが、
実はcertbotは別のコマンドでgitからインストールしていたので今回は飛ばしました。
certbot-autoのコマンドで--nignxを追加するとよしなにやってくれます。
$ sudo /usr/local/bin/certbot-auto --nginx
Cert is due for renewal, auto-renewing...
Renewing an existing certificate
Performing the following challenges:
http-01 challenge for ubansi.com
Waiting for verification...
Cleaning up challenges
Deploying Certificate to VirtualHost /etc/nginx/conf.d/ghost.conf

Please choose whether or not to redirect HTTP traffic to HTTPS, removing HTTP access.
- - - - - - - - - - - - - - - - - - - - - - - - - - - - - - - - - - - - - - - -
1: No redirect - Make no further changes to the webserver configuration.
2: Redirect - Make all requests redirect to secure HTTPS access. Choose this for
new sites, or if you're confident your site works on HTTPS. You can undo this
change by editing your web server's configuration.
- - - - - - - - - - - - - - - - - - - - - - - - - - - - - - - - - - - - - - - -
Select the appropriate number [1-2] then [enter] (press 'c' to cancel): 2
Redirecting all traffic on port 80 to ssl in /etc/nginx/conf.d/ghost.conf

- - - - - - - - - - - - - - - - - - - - - - - - - - - - - - - - - - - - - - - -
Your existing certificate has been successfully renewed, and the new certificate
has been installed.

The new certificate covers the following domains: https://ubansi.com

You should test your configuration at:
https://www.ssllabs.com/ssltest/analyze.html?d=ubansi.com
- - - - - - - - - - - - - - - - - - - - - - - - - - - - - - - - - - - - - - - -

IMPORTANT NOTES:
 - Congratulations! Your certificate and chain have been saved at:
   /etc/letsencrypt/live/ubansi.com/fullchain.pem
   Your key file has been saved at:
   /etc/letsencrypt/live/ubansi.com/privkey.pem
   Your cert will expire on 2019-12-15. To obtain a new or tweaked
   version of this certificate in the future, simply run certbot-auto
   again with the "certonly" option. To non-interactively renew *all*
   of your certificates, run "certbot-auto renew"
 - If you like Certbot, please consider supporting our work by:

   Donating to ISRG / Let's Encrypt:   https://letsencrypt.org/donate
   Donating to EFF:                    https://eff.org/donate-le
途中で選択する項目が出てきます
1: No redirect - Make no further changes to the webserver configuration.
2: Redirect - Make all requests redirect to secure HTTPS access. Choose this for
new sites, or if you're confident your site works on HTTPS. You can undo this
change by editing your web server's configuration.
これはnginxの設定ファイルの変更に関するもので、
1 は特に変更しない。
2 はcertbotがhttpアクセスをhttpsアクセスに変更する設定をnginxの設定ファイルに書き換えます。
変更後に確認したところこんな項目が増えていました
    if ($host = ubansi.com) {
        return 301 https://$host$request_uri;
    } # managed by Certbot
2を選びましたがよく考えたら設定済みでした。
証明書の自動更新
次に証明書が自動的に更新されるようにcron化します。
certbotのサイトの4. Set up automatic renewalのコマンドを見ると
echo "0 0,12 * * * root && /usr/local/bin/certbot-auto renew" | sudo tee -a /etc/crontab > /dev/null
となっています。
このコマンドを実行するとcrotntabに証明書の更新処理が追記されます。
コマンドにあるpythonの命令の
python -c 'import random; import time; time.sleep(random.random() * 3600)'
が気になって一瞬なんでpyton?って思いましたが
処理的には0~3600秒待つとなっているので、
証明書更新の時間をランダムにずらすことで
certbot側のサーバへのアクセスが集中しないようにするためのものだと思います。
...python入ってますよね?
コマンド実行後cronを確認すると
$ cat /etc/crontab
SHELL=/bin/bash
PATH=/sbin:/bin:/usr/sbin:/usr/bin
MAILTO=root

# For details see man 4 crontabs

# Example of job definition:
# .---------------- minute (0 - 59)
# |  .------------- hour (0 - 23)
# |  |  .---------- day of month (1 - 31)
# |  |  |  .------- month (1 - 12) OR jan,feb,mar,apr ...
# |  |  |  |  .---- day of week (0 - 6) (Sunday=0 or 7) OR sun,mon,tue,wed,thu,fri,sat
# |  |  |  |  |
# *  *  *  *  * user-name  command to be executed

0 0,12 * * * root python -c 'import random; import time; time.sleep(random.random() * 3600)' && /usr/local/bin/certbot-auto renew
0時か12時に無事登録されたみたいです。
1日2回は更新しすぎなような気もしますが…
以上でSSLの導入と自動更新は完了しました。(多分